
 |
This article falls under the category Expert Mode.
To avoid frustration or confusion, we recommend getting familiar with the Expert Mode first. Further more, in-depth knowledge of Gameplay Basics is assumed at Expert Mode articles.
| ||||||
This is our gateway article to all the advanced flying techniques that the community found out.
What is Fancy Flying?[]
Fancy Flying (FF) is when you control your camera in addition to your character to gather energy with a dive and release it in the form of a boost.
Some techniques are simple and don't need much practice ; others require immense precision and dedication. They all involve methods to gain height, distance and/or speed in ways you might not have imagined, and can help you explore all sorts of new areas!
A player who is skilled in fancy flying is often called a Fancy Flyer. For a fancy flyer, FF is a whole different gameplay and approach to Journey which delivers lots of fun and fulfilment.
Fancy Flying is mostly used as a white robe for its ability to recharge upon touching the ground, but red robes can also perform many flying techniques (not all of them, or only for a short amount of time depending on the scarf length). It's recommended to start learning them as a white robe.
About using a Controller, Keyboard, Mouse...[]
Most Fancy Flyers play with a controller because of early PS3 and PS4 releases of the game, but also, a controller allows the user to perform every Fancy Flying techniques discovered so far. Most tutorials on youtube are also intended for controller users because of it.
![]() The mastery-boosts often require precise positioning of both the camera and the Wayfarer (with the left stick only pressed forward up to a certain point on a controller, and so on). For all explanations / descriptions and assumed difficulties, the standard settings are assumed. On the PS versions both shoulder buttons are default for fly, not on PC when playing with a controller though. Mentioned below are some controller button remapping tips to make Fancy Flying easier.
The mastery-boosts often require precise positioning of both the camera and the Wayfarer (with the left stick only pressed forward up to a certain point on a controller, and so on). For all explanations / descriptions and assumed difficulties, the standard settings are assumed. On the PS versions both shoulder buttons are default for fly, not on PC when playing with a controller though. Mentioned below are some controller button remapping tips to make Fancy Flying easier.
|
|
Keyboard / Keyboard and Mouse: The boosts that you probably can't perform without a controller Steam guide for FF with Keyboard/Mouse The Wiki is still heavily under construction, it might not be mentioned in each Fancy Flying article if it is possible with a keyboard or not. If a Fancy Flying article speaks about finding a certain position point between fully forward and not forward at all on the left stick (movements), it's likely that you will not be able to accomplish the corresponding trick with a keyboard/mouse. You really should consider using a controller, if interested in advanced Fancy Flying techniques. |
Fancy Flying and interaction with other players[]
![]() There are some points of view on Fancy Flying: a newcomer stumbling upon a Fancy Flyer (training maybe), a Fancy Flyer meeting the newcomer, or two Fancy Flyers meeting each other.
There are some points of view on Fancy Flying: a newcomer stumbling upon a Fancy Flyer (training maybe), a Fancy Flyer meeting the newcomer, or two Fancy Flyers meeting each other.
Journey is about respect and empathy:
- One needs to be able to identify what the Companion is able to and willing to do.
- Respect other players when "only training" / not wanting a newcomer Companion.
Hints for training Fancy Flying in BB:
You do not want to meet anyone
- Go offline or go through the vision before starting to train.
- On Steam you can launch Steam in offline mode for this.
- Epic Games version, no problem: You do not meet Companions anyway (bug).
- Activating one or all bridge banners prevents you from meeting people who just happen to enter the level (also those that want to connect with a specific friend, not you).
You don't mind meeting others
- Do not activate bridge banners, do not go through the vision.
- Any player entering the level will most likely connect to you.
You want to play coop
- Activate one or all bridge banners.
- Upon meeting, try to figure out quickly if you would like to travel with them (sometimes two Fancy Flyers meet and just enjoy flying around too).
- Even a Red Robe can do many Fancy Flying things, some people enjoy the extra difficulty.
- If you feel like you cannot "handle" the player: either disconnect, open menu and "chapter select", or enter the vision without them to cause a disconnect.
- Please keep in mind: most often people will play Journey to meet other players and travel/interact with them.
Always keep in mind that the range of things to do in Journey is very wide, not everyone digs into Fancy Flying, or they just learn the most basic boosts. It also depends on curiosity, since if one does not research about Journey or get help from a Companion met, they might never get to know about FF.
How do you Fancy Fly?[]
As many things in Expert Mode, FF knowledge also builds up over time.
The first thing to understand is how the angle of the camera affects the angle of your flight during the dive or boosting phase, as well as learning to not use the jump button when attempting to boost up (it would slow you down for a second at every jump).
Assuming you had the chance to Tandem Fly with Companions (or even Coasting), the next recommended steps are:
- Dive Boost: this is a normal in-game mechanic, but with experience it could be seen as exploit (diving is only allowed in "glitched" categories for speedruns).
- Once you get a feeling for this and how walls or the ground can affect the camera, the path is open for Dropshoot and Charge Boost.
If you ask a Fancy Flyer player for hints, they often will say "It's best if I observe your training, to see where the problems lie". Video tutorials can help to get the idea, but trying the thing over and over again and eventually getting in-game help from a player might be needed to learn the harder boosts.
Angling the camera less toward the ground during a dive (or less toward the sky during a boost) can help you gain more distance and speed over height, possibly at the cost of a weaker boost, depending on the fancy flying technique used. However, the primary key to fancy flying, is that flying downward will create a dive.
It's this mechanic that players use - and often abuse - in order to fancy fly.
We try to provide video instructions WITH a visible controller (or representation thereof) to better help aid in learning.
Considering that people all use different kind of settings (Example: for PlayStation version, Fancy Flying with a sixaxis controller can make a big difference and greatly enhance the difficulty), it's hard to explain every details on a Wiki.
Terminology[]
A "Dive"
is when you aim your camera to the ground while in the air, and move forward in order to move fast towards it, much like a bird of prey. Allows one to gain speed while building up boost power (also called the charging phase), and is the base of every Fancy Flying techniques. Even doing so on the ground or against a wall (see dropshoot or charge boost) is still considered a dive because you trick the game into thinking you actually dive on the ground itself.
A "Boost"
A boost example: here Charge Boost. Notice how the wayfarer "dives" into the wall and "flaps" their robe a few times before the boost.
is when you are able to rise up very high and fast in the air, without pressing the jump button. To get a boost, some kind of "charging up / building up energy" is needed beforehand with a dive.
Can also refer to any specific flying technique.
Boost Power
A hidden value expressed in seconds that tells you for how long you can boost. Could be seen as "energy" or "boost strength" as well, and is sometimes called (incorrectly ?) "momentum" on this wiki.
The more a camera is placed vertically when charging, the higher the max boost power value gets. This boost value almost only depends on how long you dive with the associated camera angle, although a very light left stick pressure and sideways orientation of it on a controller can also reduce it. Regardless of the camera angle, you always build up boost at a constant rate during the dive (until you reach the max value).
Here is a very detailed article about boosting power and how to Fancy Fly more efficiently.
"Slow" <boostname>
Most boosts have some variations. "Slow" boosts are variants of the standard techniques they are named after, characterized by their slow pace and the increased height they provide after boosting, when diving in the air.
They don't actually help in providing a stronger boost, but instead, make you fall more slowly during the dive, and therefore losing less altitude / charging longer before hitting the ground. When performed on the ground (slow dropshoot), they can help with precision in the movements. "Slow" charge boosting however is not only useless, it can also make you fly off the wall more easily when charging, and destroy the boost.
"Slow" boosts are performed with a light left stick pressure on a controller, and some require immense precision. Not suitable for keyboard / keyboard and mouse.
"Reverse" <boostname>
Reversed Fancy Flying techniques are performed with a camera facing the sky instead of the ground during a dive. They often give very powerful boosts because of a more vertical camera angle than normally possible (higher max boost power value), but they tend to be harder to perform than the regular ones: to initiate a dive in reverse you need to use some boost from a previous dive, to help with the transition. Otherwise you will only slowly fall with a camera to the sky (no dive). It also gets hard to know where you are headed to during the reverse dive part.
"Slow" reverse Fancy Flying techniques can be performed as well, although very hard to do well and with few practical use, other than for fun ? However, it seems complicated to keep on diving in reverse with a light left stick pressure (on a controller) when touching the ground (dropshoot and variations). Hence why slow reverse FF could be an idea for aerial boosts mostly, for those willing to give it a try (slow reverse dive boost, slow reverse level boost, reverse flap boost, and maybe even reverse infinite boost !?)
A "Flap"
is when your robe spreads like the wings of a bird, often when applying only very little or no pressure on the left/movement stick in the air, and jumping in this position.
This is especially used for Flap Boost (a rather advanced FF technique). See also Charge Boosting, where you fly against a wall and can count the times your robe moves that way, to keep track of the charge: this word can often be a little abused into describing how often you press on the fly button, or how long you keep on pressing it. It could be used to describe distances, etc.
A "Twirl"
is when your character spins in the air during a dive, usually when applying a medium or full pressure on the movement stick and jumping (or simply pressing the forward key from a keyboard + jump). It can happen while charge boosting too sometimes.
"Pumping"
is when you press the fly/jump button at regular intervals, instead of holding it down during the dive. Both can be used depending on the circumstances, FF technique, and your preference.
While jumping during a dive doesn't help with increasing the boost power faster, it slows your falling speed down for a second in the air, and can help gaining better height after boosting because of it (similar effect to using "slow" boosting techniques).
You have to press and hold the jump button down continuously for Fancy Flying techniques performed on the ground or against a wall, to stick to it.
List of Boosts[]
For more information about the icons and how difficulty is applied to articles.
So Many Boosts![]
The following list of boosts might be a bit overwhelming.
Some boosts do look almost the same, but the outcome is different and use a different technique to achieve it. The difference between them might be a precision thing (example: Flap Boost, Slow Boost and Ainshent Boost which are related in many ways).
It's about what you want to achieve with the boost, choosing the right one based on experience, situation, environment, Companion, and what you like.
Some boosts are:
- Used to quickly travel long distances
- Used to dive in narrow places (if pillars or walls inhibit other techniques), let's say to boost high, not far
- Used to be able to "charge" in a small circle on the ground, when there is only one little place to charge
- Can be combined to achieve a better boost, but some combination of boosts might just give a small boost only
This article is more to present ALL the techniques there are, even though you might not recognize the differences at first.
You will feel it, once you master these boosts (the most basic boosts - dive boost, dropshoot, charge boost - will bring you far).
Companion Needed[]
Coasting
Beam Down
 Tandem Flying - Keeping each other in the air by recharging each others Scarves through Chirps or touching. Sometimes it just goes over into the 2 following:
- Coasting - Levitating forward. Achievable when both companions glide forward without pressing the fly button and glow from each other. Sometimes coasting without chirps is called Silent coasting.
- Beaming Down - Levitating down with a companion very slowly while glowing from each other.
- Infinite Flight (IF) Infinite Flight (IF) - Technically a glitch and not a technique, which allows a player to connect with Nick (visible or invisible depending on platform). It appears under certain circumstances, see articles. Allows one to fly without spending any scarf and with infinite Coasting or Beaming Down abilities. On Steam it is reproducible and can be used for certain Steam Infinite Flight Tricks. Fancy Flying with Infinite Flight glitch.
Solo Possible[]
Note: Even a Red Robe can perform most of these boosts as long as they have some scarf power (it helps having a Companion or cloth to recharge).
Dive Boost and variations (air)[]
Dive boost
Flyer Boost (associated with Flap Boost before the chirp and then Ainshent/Slow Boost)
- Dive Boost (DB) - A technique in which one gathers height after diving down, with the following boost. As far as known, the non exploit way of doing this is naturally in the game (jumping during the dive may not have been intended though).
- Level/Speed Boost - A technique where one doesn't put the camera all the way to the ground, but levels it to a certain degree during the dive. Different camera angles are possible and useful to reach distant places more precisely/faster, and also more height compared to when dive boosting if performed well.
- to Flyer Boost - Dive boosting where one maintains their scarf power by chirping at flyers as they dive, to improve their boost capacity or travel further. Using Flyers to fly further or higher is also "in the game". Just the combination with diving might not have been intended. Works well with Slow Boost and RDB as well.
- Reverse Dive Boost (RDB) - Dive boost with reversed controls ; looking on the sky instead of the ground. Can theoretically provide a better boost if diving long enough (in practice rarely without the help from flyers, see flyer boosting)
- Slow Boost - A variation of dive boosting. Characterizes by less pressure on the left-stick, which makes a wayfarer go slower during the dive and boost higher.
- Flap Boost - A variation of slow boosting. Characterizes by very slight pressure on the left-stick: makes the wayfarer go extremely slow during the "dive". Useful with little space environment to dive in and a rather short scarf.
- Infinite Boost (IB) (and Ainshent Boost) - In a way the perfect execution of a Slow Boost. A technique that allows one to gain height without using their scarf power. Can be repeated endlessly to gain lots of height.
- Goo Boost - A technique in which one recharges their scarf in the goo before boosting, after a diving in the air-based technique.
Dropshoot and variations (ground)[]
For now, some videos of these boosts are presented on the main Dropshoot page with potential short video clips. Pages will be created later with more info.
Dropshoot
RDS
- to Dropshoot (DS) - Is often enjoyed in Pink Desert, where the terrain makes it easy to stick to the ground and run quickly. It's also used to gain some height after the fast running on the ground with experience.
- to Super Boost - Dropshooting with a stuck close-up and vertical camera angle for incredible boosts. Only possible at certain places.
- Reverse Dropshoot (RDS) - Dropshooting with reverse controls. Looking on the sky instead of the ground. This one gives a very strong boost, if you can do it. It's often recommended to learn after having studied the basic boosts.
- Circle Dropshoot (CDS) - To use when you want to charge in circles on the ground with limited space, or to have fun.
- to Slow Dropshoot (SDS) - A variation of DS that is mostly useful to make narrow turns upon dropshooting on some platforms.
- Slow Circle Dropshoot (SCDS) - A very hard variation of dropshoot often performed after getting a slight "super" camera angle type, for a stronger boost. Allows to dropshoot on extremely tiny platforms. Also looks rather impressive.
- Cave Boost and Cutscene Boost - Two unique kind of very powerful boosting techniques which leverages forced camera angles from the glyph cave in BB or any camera that gets stuck after a cinematic. Makes one dropshoot head right in the sand rather slowly with messed up controls (the camera still works but with a delay).
Charge Boost and variations (wall)[]
Chargeboost
Dry Boost
- Charge Boost (CB) - Boosting after running into a "charge boost point": a (wind)wall / vertical surface for some time. A rather easy way to gain quite a lot of height.
- Dry Boost - Charge boosting without pressing fly. Possible at certain dry-boost-points while hovering in the air.
- to Super Boost - CBing with a stuck close-up and vertical camera angle for incredible boosts. Only possible at certain places.
- Reverse Charge Boost (RCB) - CB with reversed controls, similar to RDS. Looking at the sky instead of the ground. Provides a very strong boost.
Boost comparison with images and tables[]
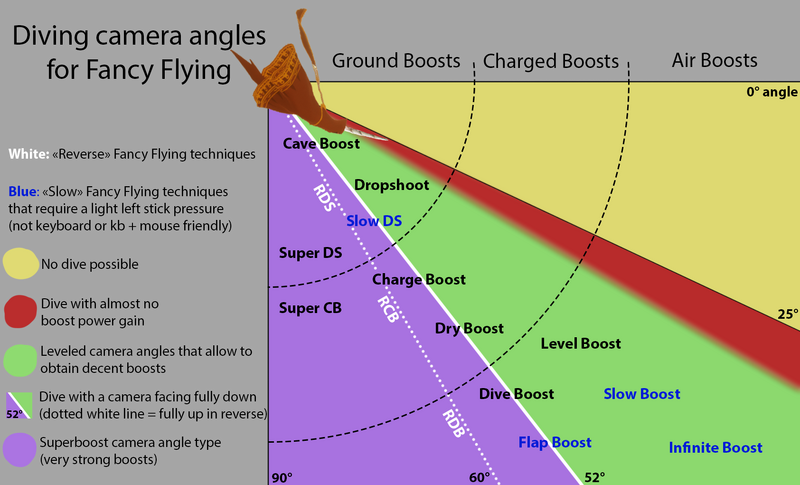
Here is a graphic displaying most of the Fancy Flying techniques depending on their associated diving camera angle. This may help you better picture the overall existing fancy flying techniques.

Concerning the FF techniques written in the middle of the green zone on this graphic, it means they can most likely be performed with a camera facing either fully to the ground, and up to a leveled camera angle of about 26° under the horizon at best. Depending on the technique and what you want to achieve (speed/distance versus boost power most of the time), you may want to adjust this diving angle accordingly upon using these techniques. More info on the concerned individual FF pages.
![]() If you play without a controller you can most likely forget the idea of learning the Fancy Flying techniques in blue on this graphic, as they require the ability to move slightly forward only.
If you play without a controller you can most likely forget the idea of learning the Fancy Flying techniques in blue on this graphic, as they require the ability to move slightly forward only.
There is another way of representing almost every fancy flying techniques based on the maximum height they can provide once mastered ! (no coop techniques, nor Goo Boost which don't provide any boost):
| Boost Power | Air Boosts | Ground Boosts | Charged Boosts |
|---|---|---|---|
| Weaker Boosts | Dive Boost, Reverse Dive Boost | ||
| Level Boost | |||
| Great Boosts | Flap Boost, Slow Boost, Ainshent Boost | ||
| Dropshoot, Slow DS, Circle DS, Slow Circle DS | |||
| Flyer Boosting with Dive Boost or Slow Boost | Charge Boost and Dry Boost (depends on the CB/Dry Boost point) | ||
| Amazing Boosts | Flyer Boosting with RDB | Reverse Dropshoot | Reverse Chargeboost |
| Insane Boosts | Cave Boost and Cutscene Boosts (with Flyers) | ||
| Cave Boost and Cutscene Boosts | |||
| Super DS | Super CB | ||
| Other (OMG!) | Infinite Boost (can be done for hours) | ||
| LFG Warp (not Fancy Flying) |
The difference of possible height gained between two rows on this chart can be minimal or rather big.
This is why a "Boost Power" column was added, to better sort them together.
The "weaker boosts" category can still be very useful and provide decent height when done under the right situations and with a good execution, so don't forget about them ! (especially the Level Boost, which combines really well with Dropshooting upon travelling long distances fast)
I compared all these techniques in-game in the best way I could, and also with hacks allowing me to monitor my boost power, height, speed,..., in real time thanks to Paleologos and Peksa.[1]
| |
| Spoilers end here. | |
Here is another chart that compares the left stick pressure (movements) with the associated camera angle for aerial boosts.
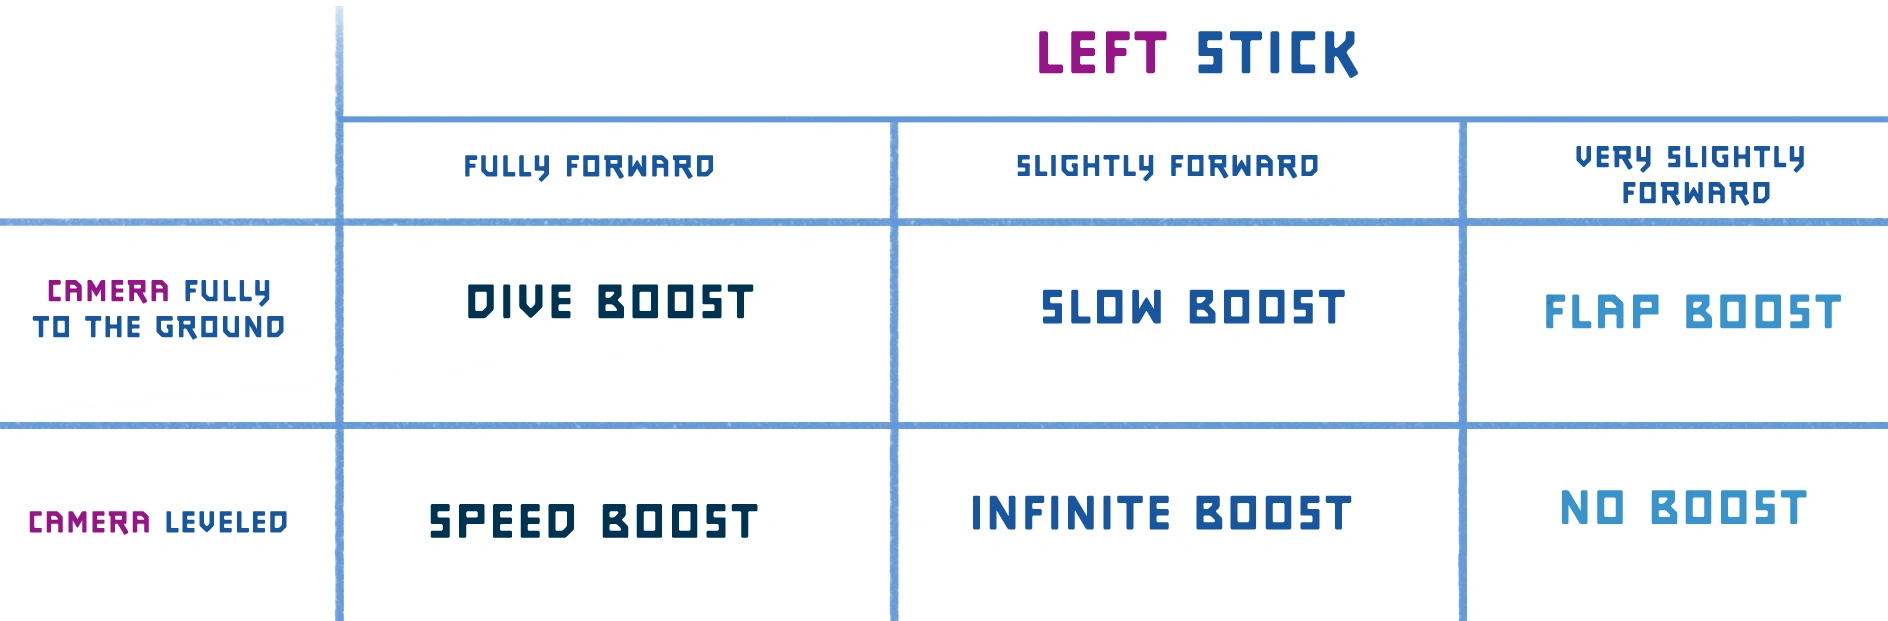
Note that it doesn't show a Slow Boost can also be performed with a leveled camera angle, while remaining different to Infinite boosting (no scarf usage for IB and extremely high precision required).
General Fancy Flying advices[]
See the notes below, about why a controller is recommended.
It’s worth repeating that many guides assume you’re using the default, controller-based camera controls. Be sure to know what the guide is asking you to do (right-stick up / = camera to the sky; right-stick down = camera to the ground), and try to adjust accordingly, if needed, and as much as possible.
Important basic knowledge[]
- A basic rule that applies to most Fancy Flying techniques is that the more your camera aims to the ground during a dive, the more you will be able to store Boost Power.
- The max boost power value is reached faster the flatter the camera angle gets, and the boost will be weak no matter how long you dive.
- Though this doesn't mean having a camera aiming fully to the ground is always the best solution depending on the fancy flying technique and what you want to achieve (especially considering having a camera fully to the ground also makes you fall faster when in the air, and therefore loose more altitude before boosting).
- For Fancy Flying techniques performed in the air, such as Dive Boost, always try to fall off a platform to initiate the dive rather than jumping off it, and waste a jump that won't contribute to slowing your falling speed down for a longer dive or higher boost starting point.
- Not always possible (ex: top of a dune of sand).
- If you play with a controller, think about pushing your left stick fully forward at the start to initiate a strong dive, for any fancy flying technique.
- Eventually release the pressure on this left stick for "slow" boost variations shortly after.
- The same thing goes for the right stick, when willing to dive with a leveled camera angle: it is common to start the dive with a camera fully to the ground or almost, and as soon as you start diving, adjusting it more horizontally. You actually can't initiate the dive without actively pushing the camera down (simply aiming it down beforehand isn't enough, unless you have some remaining boost at that moment).
- This helps initiating a dive fast and with choosing the best camera angle later. This advice is probably also relevant for keyboard or keyboard and mouse players.
- When diving, if the left stick on your controller isn't completely forward but a bit sideways it can also be hard to charge properly (especially with leveled camera angles) :
- So be sure to have the left stick fully forward as much as possible at any moment during a dive (On PC without a controller: press only the w key when diving on a qwerty keyboard).
- The opposite is also very much true for reverse techniques, although due to a more vertically placed camera in reverse, the margin of error does allow the left stick to be turned a little more sideways without ruining the boost ! (when turning sharply for RDS) Though please still pay attention, as it is easy to turn too much in reverse as well and start losing boost instead !
- You should take the habit of turning with the camera only during a dive.
- Some more advanced Fancy Flyers may choose to dive with a camera placed sideways to the character and a left stick pushing a bit sideways on purpose however (especially for Infinite Boosting or circle dropshoot techniques, but it tends to be risky for charging nicely).
- During a dive in the air, in most cases rather than holding the jump button down you may want to pump it about every second, for a longer dive and better boost efficiency (with the possible exception of when flyers are involved: see Flyer Boosting where you can either hold jump, pump it or don't jump at all as they carry you ! You can also hold jump down if you are in a hurry to boost.)
- There are two main ways of boosting (Camera to the sky while moving forward, or camera to the ground while moving towards it).
- See the Dive Boosting article for a video example with controller shown.
- Both ways are important to use depending on the situation.
- Boosting with a camera to the sky helps aiming better at your destination and can be faster to travel long distances (dropshoot and level boosting). However if you empty your boost camera fully up, the camera will move very slowly and it will take long to start another dive after.
- Boosting with a camera to the ground allows a quicker boost start (plus no boost and time loss flipping the camera around, unless in "reverse" already). It also helps retrieving a diving position faster later, high in the air.
- To boost this way and in the same direction as the one you are diving towards initially, think about turning the camera sideways during the end of the dive, before boosting.
- When boosting with a camera to the sky the camera angle is slightly more vertical (60° vs 52°), meaning you gain very slightly more height, and a little bit quicker (subtle difference).
- A mouse on PC is always fast on the other hand, so both ways of boosting seem more or less equal. It's also a matter of preference.
Slightly more advanced knowledge[]
- Because the camera angle is important when diving, anything that causes your camera to level out could potentially reduce - or even completely negate - your boost.
- See the Video tutorials section of this page for a video on common boosting mistakes when diving in the air (and how to avoid them).
- Most of these common mistakes are: getting too close to the floor / pillars / platforms / walls, as it can change the camera angle.
- You can try to boost before this happens, or modify your trajectory and avoid them. However, as explained in the video linked just above, a way to help preventing camera troubles in these situations is not giving any up or down input to the camera when close to these objects, and instead leave the camera stick position neutral (or stop moving with your mouse/keyboard arrows on pc).
- It's also possible to give strictly right or left camera inputs when close to such objects or the ground and even flicking the camera stick if needed (See the Dropshoot page for info on the flicking technique and how to keep a camera to the ground with a controller, or keyboard only).
- Note nearby platforms (or a companion standing behind you !) can also prevent aiming a camera fully to the sky, when boosting this way, rather than when facing the ground.
- It is possible to dive the normal way or in reverse for reversed fancy flying techniques.
- Reverse dives are hard to achieve, because simply putting the camera to the sky and moving towards it won't make you dive (you will only walk or fall slowly).
- A reverse dive needs to firsthand build up some boost power with any fancy flying technique and use it to force the reverse dive afterward. See the Reverse Dive Boost article for a technique that can theoretically provide better boosts than the regular Dive Boost (if diving long enough), and see how to do it.
- When lifting off the ground or from just over it with a camera aiming down for the boost, it is better to not touch the camera at all at the start of the boost.
- Maybe flick it left and right if needed, but only push it down after about two seconds to avoid having the camera flatten during the start of the boost, and therefore loose a little bit of height in the end.
- This camera flattening phenomenon is very commonly observed upon lifting off a Charge Boost or Dry Boost point, or after a Dropshoot.
- It doesn't matter much if you hold it to the ground right away anyway, but it can be something to keep in mind for better control and boosting abilities.
- Get familiar with how the Boost Power behaves in the game.
Video Tutorials[]
While many tutorials are specific to certain kinds of tricks, here are some that cover boosting in general, or a variety of basic techniques.
If not explicitly mentioned, the video covers on both PS3 and PS4 consoles (and possibly PC). The video description just says where, in the game, the video was recorded.
YouTube channel recommendations[]
Often you will find some additional hints or links to other videos in the video description.
Some YouTubers cover different topics about Journey, but also flying (list to be expanded):
With a Controller Shown[]
This video explains the three basic boost methods. CAPTIONS REQUIRED (EN + JP + auto translate).
How to fancy fly, a tutorial with controller that shows several different flying techniques (Dropshoot at 0:36):
Without a Controller Shown[]
Boosting mistakes and how to avoid them (English and Russian subtitles). This video concentrates especially on advanced "aerial" boosts such as Flap Boost, Slow Boost and Ainshent Boost, but some tips in it are helpful even for dive boost, level boost and so on.
- (00:30) hint to slow or flap boosting (the two are often mixed in this video, and flap boost is many times called slow boost in it)
- Camera movements
- (03:28) Jumping before the dive boost (better)
- About combining boost techniques (leads sometimes to less boost, because Flap Boost has a lower max boost power value)
- (06:25) flap boost and then "ainshent boost" gives amazing height
Notes About Controls[]

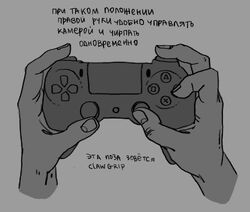
Many players use the claw or similar handling for fancy flying and other tricks
Basic information about controls: How to play guide for Journey, Controls.
Use a controller
Highly recommended.
- Some fancy flying techniques can only be done with a controller. Those, where you have to control precisely the left stick pressure ("slow" techniques)
- You can not only "half" press a button on your keyboard.
- It's generally recommended to use the shoulder buttons for flying (and possibly chirping) with a controller. For some techniques, you need to perform all of these actions at the same time that use the thumbs on default button mapping:
- Control the wayfarer
- Fly (Jump button)
- Chirp
- Control the camera
By using the shoulder buttons instead, you can dedicate the right thumb to controlling the camera and chirp, or camera only. However, depending on your situation (controller, hand size, etc.), you might find it easier to use the ‘claw method’ (shown to the right), or something similar.
- Remapping buttons: Click the link to see how to remap your controller or keyboard configuration on PS4 or PC.
- Many experienced longterm players on PS4 remapped their buttons, to avoid using the claw for certain tricks.
- For example putting the chirp button on a shoulder button, could make things easier.[2] The boosts are still doable by just using the claw.
- The PC versions allow you to remap your controls within the game.
- WARNING: Take care about using the RT button on Xbox controller (or possibly R2 for PS controllers).
- It had been reported by multiple users to make the game crash when collecting symbols, flying into banners, approaching glyphs,...
- WARNING: Take care about using the RT button on Xbox controller (or possibly R2 for PS controllers).
- Many experienced longterm players on PS4 remapped their buttons, to avoid using the claw for certain tricks.
- Sixaxis: In some cases (playing on any PS platform, for instance), you can move your camera with just moving your controller.
- This can make fancy flying very hard, because you need to hold your controller perfectly still while charging in order to not mess up the camera angle.
- If playing on PlayStation, you might consider getting a controller without sixaxis or disabling it somehow.
- Some very advanced players though, said they can make good use out of sixaxis.
- versions do not naturally support sixaxis.
- It might be possible to emulate it somehow, but it not working has an advantage.
- The camera controls can be adjusted/inverted in the game preferences, and the left and right sticks can be swapped, too. However, explanations on the wiki or most youtube videos assume you’re using the default controls on a standard controller.
- "right-stick up" / look up means "camera to the sky,"
- "right-stick down" / look down means "camera to the ground",
- same for the left stick / movement forward or backwards (towards the camera).
- Be sure to adjust for whatever control scheme you use, as much as you can, but remember that the Wiki will call things differently than your settings.
- It also helps to use the same model of controller throughout your practice.
- If you use a different controller, which has different sensitivity, then it can really mess with your muscle memory and you may need time to readjust again.
- While this is usually not very important, it can make a big difference when doing more complicated boosts that require precise control.
Trivia[]
Secret flying techniques called "Swooping" were added by the developers late during the development.[3] They eventually became what we call today Fancy Flying.
Swooping hasn't been tested much and this is probably the reason why we can do so much with it today! It wasn't intended to be as diversified as all the techniques figured out by the Journey community over the years.
We can assume the "swooping" intended by the developers possibly included dive boost, level boost, slow boost and maybe even reverse dive boost (without jumping during the dive?). It is hard to know whether they imagined Tandem Flying, Coasting or Beaming Down being a thing.
Quotes[]
| “ | *while trying to do fancy flying tricks* You fuck up my camera by staying down ! (...)
I never had a companion mess up my camera so much as you before! Each time i want to check something you drag the camera with you XD |
„ |
| ~ nathanj, complaining about Ravingmadness being a little too friendly, on Discord 2020-06-02 |
| “ | I learned most of my fancy flying techniques while waiting for companions to connect in Broken Bridge, on PC | „ |
| ~ nathanj |
| “ | Very confusing for a newcomer, but absolutely FASCINATING to witness for the first time. They were like rockets flying straight up!! I was sad I didn't know how, but at least I KNEW it was possible. | „ |
| ~ SharifaSeshat |
See also[]
References[]
- ↑ More details here https://thatgamecompanyfan.boards.net/thread/565/story-boosting-power
- ↑ Rebi 05-27-2020, on discord: "biggest reason i have seen is to map O to L1 or R1 so you dont have to use Claw grip". O being the Chirp button.
- ↑ Source: https://twitter.com/matt_nava/status/1426804904396394497