| This article is a stub. You can help Journey Wiki by expanding it. |
This article is about things that are useful to know, when travelling regularly.
Getting started faster
This is only possible, after your first Journey.
Right at the start, after walking some steps,
- open the menu ("Select" button on PS3/PS4; controller on PC "Share")
- select "Options"
- and "Chapter Select"
- choose "Yes"
It asks you to confirm, telling you, that your progress will be lost. No worries, at this point you've only made a few steps so nothing will be lost -- Chapter Select brings you forward to the middle of the pit at the first level.
You will already have the Scarf from the very first Symbol, thus only need to pick the other two in this level.
![]() You can open the menu at the starting cutscene already.
You can open the menu at the starting cutscene already.
Graphics options
For this beautiful game its highly recommended to use some minutes to check how the game looks on different settings, to get the best out of it. Higher contrast and brighter colors can make the sand even more sparkly.
![]()
![]() PlayStation gives you little settings to adjust your game graphics. Stick to the settings of your TV/monitor!
PlayStation gives you little settings to adjust your game graphics. Stick to the settings of your TV/monitor!
![]() Take some time in the first level to check your settings in the game, at your monitor and/or settings at your GPU and see the differences. Warning:
Take some time in the first level to check your settings in the game, at your monitor and/or settings at your GPU and see the differences. Warning:
Here are comparison pictures and more information about graphic settings on PC: Information on how to tweak your graphic settings.
- Stick to the settings on your TV/monitor and try preset option or adjust colors and contrast to your liking. This can make a huge difference, colors being more vivid etc.
- (At least once you should play Journey with a headset/headphones, more details to hear with that.)
Travelling offline / playing offline
![]() In-game
In-game
- Press Start and square to enter the terms of use
- Decline them and go back to game
- Now you will not meet other players
- For going online again just press Start again, Square, and accept the TOS

PS4 network settings
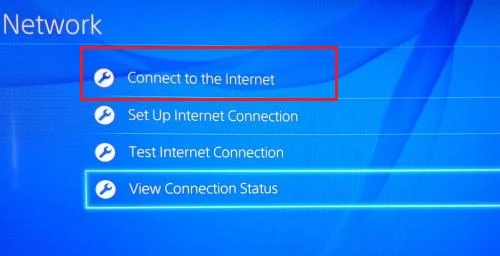
![]() System menu:
System menu:
- Navigate to Settings > Network
- uncheck "Connect to the internet" box
- to go online again, check the box
- Video that also shows this menu (its for setting up the connection at first), starts at 00:26: How to connect your PS4 to the internet.
- PlayStation manual on how to disconnect your PS4 system from the internet .
![]()
Epic Games: since a patch in April 2020, playing offline seems a bit complicated. See PC/ Playing offline.
Steam: Offline play without turning off all network traffic may be possible, but a method has not yet been discovered. However, unlike the Epic Games version, you keep your save when turning all network connections off, and so a basic form of offline play is possible that way.
Companions met along the way (CMATW)
For the CMATW it pays off to have a camera/phone ready so you don’t have to write the names down.
Especially for the PC version, since there the
Screenshots can be taken easily on PS4, on PC press Alt-PrtScn to take a screenshot from the active window (game) and paste it to a picture program.[1]
You might want to note the symbol of your companion already in game, so you can identify them.
Backup and restore a certain level with certain robe, scarf and same symbol
(Not possible on the Epic version)
Sometimes you just want to start with a long scarf at a certain level (maybe to meet a friend or just do half a Journey.)
In this section we will tell you how to backup and recover the save files (does not work across platforms).
Note: It is not possible to backup the paradise level. When quitting the game in paradise you will start at the Snow level.
What is saved?
- your symbol
- cloak color and embroidery level
- scarf length
- level
- list of companions you have had and their symbols. See Note below.
- list of symbols you have retrieved from each level
- the symbols that you have discovered and picked up, this is needed for the Transcendence trophy
- some other stuff that you won’t care about
- some other stuff that hasn’t been reliably identified[2]
![]() Recommended to do an offline Journey to get your save files.
Recommended to do an offline Journey to get your save files.
Reasons:
- On PlayStation you need to quit and restart the game, thus disconnect on eventual companions.
- The list of Companions is saved, your will have the people you met on your savefile-Journey always on your CMTAW.
 Steam version: Backup Savefiles
Backing up or resetting your save is possible on the Steam version, but it is somewhat complicated to do so.
| ====Backing up your save:====
Create a folder somewhere to hold your backups. Then open your Steam install folder (usually C:\Program Files (x86)\Steam) and open the sub folder userdata. If there is a single folder open that folder and continue. Otherwise follow the steps in "finding your Steam Id" and then continue here. Open the folder 638230 and then the folder called remote. Copy SAVE.bin into the folder you created and rename as you please. That's it. Restoring a backup:(For all of these steps you want to select yes, overwrite the existing files) Then open your Steam install folder (usually C:\Program Files (x86)\Steam) and open the sub folder userdata. If there is a single folder open that folder and continue. Otherwise follow the steps in "finding your Steam Id" and then continue here. If you didn't already, open the folder named 638230. Then copy the backup from your backup into the folder called remote. Delete the existing file called SAVE.bin inside the remote folder and rename your backup to SAVE.bin Resetting your save:First, turn off your network connection. Open C:\Users\%username%\AppData\Local\Annapurna Interactive\Journey\Steam and delete the file SAVE.bin (You may have to change this path if C: is not your primary drive) Then open your Steam install folder (usually C:\Program Files (x86)\Steam) and open the sub folder userdata. If there is a single folder open that folder and continue. Otherwise follow the steps in "finding your Steam Id" and then continue here. Open the subfolder 638230 and delete remotecache.vdf Then open the subfolder remote and delete SAVE.bin Finally, turn of your network and start the game. Once Journey is on the main menu, you can turn your network connection back on. Finding your Steam IdIf only one user has ever played Journey on this computer, then this step is fairly easy. Just go through each folder inside userdata and determine which one contains a subfolder named 638230. Open whichever folder does, continue the rest of the steps above. If more than one user has played Journey on this computer, then you can try using a website such as <https://steamidfinder.com/> to find your id. To use the website, simply type in your Steam name and click "Get SteamId". Find the line that looks like steamID3: [U:1:123456789]. You want the part that looks like 123456789. That is your Steam Id. If that value is zero, then the website could not find your Steam Id. Otherwise, you can continue with the rest of the steps. If the value was zero or you were otherwise unable to find your Steam Id, please ask in the Journey Discord server. As of yet much of this information is still very new, and new methods are still being discovered. | |
| Spoilers end here. | |
| This is a quick copy/paste from Discord and was not tested by the editor that added it.
Warning this method causes a steamcloud error-dialogue. which needs to show, to change the folder for the save.bin.. Link to the actual message, with images: https://discord.com/channels/295204028881698816/706360736116506664/751778693227216968Ravingmadness (talk) 18:18, 18 January 2021 (UTC) by RONG_R 蛤 05.09.2020 Please backup the original white robe before resetting. 1. Please leave/sign out of steam before resetting, no need to shut down the network. 2. Enter, C:\Program Files (x86)\Steam\userdata\user-number\638230 638230 is the folder number of the journey in STEAM. 4. Enter 638230 5. Delete remotecache.vdf 6. Enter remote folder 7. Change the SAVE.BIN file format to open with Notepad. 8. Open "SAVE" that has become a notepad file, and delete all contents. 9. Open and log in to STEAM. 10. Enter the collection library, click JOURNEY . ((Please don't press start game)) 11. Go back to the 638230 folder and delete the newly generated remotecache.vdf again.
14. Choose this computer host file upload. 15. The experienced red robe players, go and enjoy the journey~ | |
| Spoilers end here. | |
Epic Games version: Backup Savefiles
Since the new version 1.59 the old and also new save files do not reset the current state of the game, aka "it is not possible to make backup saves work".
The community is trying to find a way to delete all your progress and start as a first run again (02-05-2020), eventually also finding a way how to backup a certain level again.
If you have found a solution, please share your discovery here.
| Find the savefiles. Open the explorer and navigate to a folder called something like: C:\Users\YourUsername\Documents\Journey or a specific folder you chose. File: save.bin, the journey.cfg is only for configs (you might play around with the numbers in that file, but be sure to make a backup first!)
Make a new folder whereever you would like, rightclick and new --> folder, click it once to rename/rightclick rename. Recommendation: in that journey folder or in your documents, just so you dont have to open a completly different location. Maybe even send to desktop as link, for faster access (at least while you are doing the backups). Within that folder create other folders for every level like CS, BB etc. and a tag if its redrobe or white robe backup. The game saves only at the end/start of a level. So you can do a backup anytime (when no companion to lose :)) for a certain level. Needs testing: you have to close the game? shouldnt be the case. In game you can alt+tab into windows, go to the save-file folder and mark both files. Press ctrl+c or rightlick on them and select "copy". Open your specific backup folder and insert the copied files with ctrl+v or rightclick and "paste". Restore the backup Just go to your backup folder, mark the backup-files and press ctrl+c or rightlick on them and select "copy". Then go to the C:\Users\YourUsername\Documents\Journey folder delete the files or just overwrite them when windows asks you, when you try to copy. Press ctrl+v to paste the files or rightcick and choose paste. Then start journey and press continue. | |
| Spoilers end here. | |
PS3/PS4: Backup Savefiles
2 Versions: USB or Backup-User on PS
USB-Stick: only some KB are needed, but only one save per USB works. Follow the instructions, you don't need to make another user account.
- Create another user on same PS. There is no account/login needed or login in PSN needed. You can make as many as you like.
- You first need to set up the state you would like to backup of course.
- Go to the level that you want to save, with the scarf, robe color and embroidery you like, then: quit the game.
- Go to the game-directory, move up until “Saved Data Utility”, select it,
- then scroll to Journey and press triangle. PS4: under settings, “Application Saved Data Management“.
- Choose copy and then copy to that USB or the other account that you made before. Note: There is the PlayStation+ symbol, but for copying onto USB/user you don't need PlayStation Plus. Just select "copy" and a menu will open, asking where to copy.
- You can now start the game and journey as normal. Making another backup at next level...
Restore the backup
- Delete the savefiles from main-account: Go to the game-directory, move up until “Saved Data Utility”, select it, then scroll to Journey and press triangle and choose delete. this is needed because it cant overwrite existing save-files.
- Then login to the backup-account, go to Saved Data Utility, Journey, hit triangle and copy TO the main account.
- Go to your main account and start Journey, choose select to start at the backed up state. Enjoy.
- USB: copy from the USB to main account.
Warning It will say at the start, that it cannot save new content, because you are not owner of the files. It doesn’t really have an effect in-game. Trophies are saved online, you cannot redo them, even if you delete your savefile. Your companion can recognize that you didn’t got a trophy (for example: if you are first run and see the ancestor and no ping sound appears, they will know that you deleted the savefiles).
Additional info: its seems the red robe skill improves with more embroidery and some white robes with only 2nd run embroidery are more experienced then some 4th run white robes. Meaning: some people choose the special not-full embroidery white robe to show that they actually know a lot. See also Companions.
Remapping controller

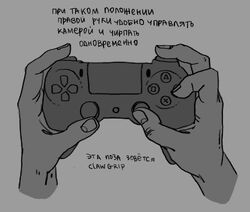
The Claw
The standard buttons assignments are here: How to play guide for Journey.
Remapping means to change the function of the buttons on your controller, beyond the options given in the game.
It was already a thing for PS4 player to accomplish certain tricks easier when using the shoulder buttons for fly (see How to play guide for Journey, Zen jump, Faceplant Jump (FPJ)).
Without remapping buttons you might find yourself using the Claw for certain tricks or flying.
PS3
There is no easy way known to this Wiki, to remap buttons on PS3.
PS4
You can change the function of the buttons within your PS4 system, no extra software needed:
- Navigate to the PS4 menu
- Settings
- Accessibility
- Button Assignments
- Enable Custom Button Assignments
- Customise Button Assignments
- Choose the button you want to change and press X, to open the menu for this button.
See this video: How to remap PS4 controller buttons via settings.
PC version
WARNING: Take care about remapping the RT button with an external program. On Xbox controller (R2 for PS controllers) multiple users reported, it made their game crash when collecting symbols, flying into banners etc. It may have to do with choosing the RT button in the in-game settings.
Note: No liability assumed. Use of programs is under your own responsibility!
The game provides you with basic remapping options. Open the menu and check "options", use arrow keys or stick to navigate through the menu.
Standard settings are shown at: Controls.
- You can play the PC version of Journey with
- a Controller, PS4, XBOX and Logitech Controller are "confirmed" to work with the PC-version, plug&play.
- keyboard and mouse
- keyboard (only)
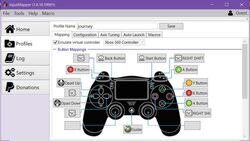
- Remap your buttons on the controller for the PC version, with extra programs such as DS4Windows, InputMapper and others.File:Using InputMapper for Journey.pdf
- If you have a DS4 controller, you can use DS4Windows to remap controller buttons (and it's a good software to have with DS4 anyways). This works well with Windows 10 (and a PS4 controller)
- InputMapper might have many ads, consider using adblock. Also it seems to not work with Windows10
- Another program is: AntiMicro. "Graphical program used to map keyboard buttons and mouse controls to a gamepad. Useful for playing games with no gamepad support."[3] See above, Journey does support gamepads.
- ScpToolkit seems to be a good solution to get other (e.g. PS3) controllers to work. Github Link
- JoToKey is a program allows you to map the keyboard keys to your controller

Screenshot taking made easy for InputMapper users. Win10
There are two ways to go about this,
- One is if you have a single monitor; you can use the Windows Key + PrtScn, just remap those two keys to two buttons on your controller, screenshots will save to your Pictures folder.
- If you have two monitors like I do then you can go to Settings and Gaming and assign Shift + some key to "Take Screenshot" (Start/Stop recording Video is available too) and then just assign those two keys to two buttons on your controller. Screenshots/videos will save to Videos folder. You can use Alt+Tab to make sure you are screenshotting your game and not the other monitor lol. Here's what my InputMapper looks like. Square+Right for image, Square+Left for video. R2+L2 also for image.
iOS
Information about how to remap buttons when using a controller connected to your iPhone or iPad is missing.
How to connect a controller to your iPhone or iPad.
- ↑ https://www.howtogeek.com/226280/how-to-take-screenshots-in-windows-10/
- ↑ information by a longer term traveller on discord
- ↑ https://github.com/AntiMicro